You can open this dialog either with the “Scanner” menu and the menu item “Settings with profile” or via the “Profile scan” section with the “Profile settings” option.
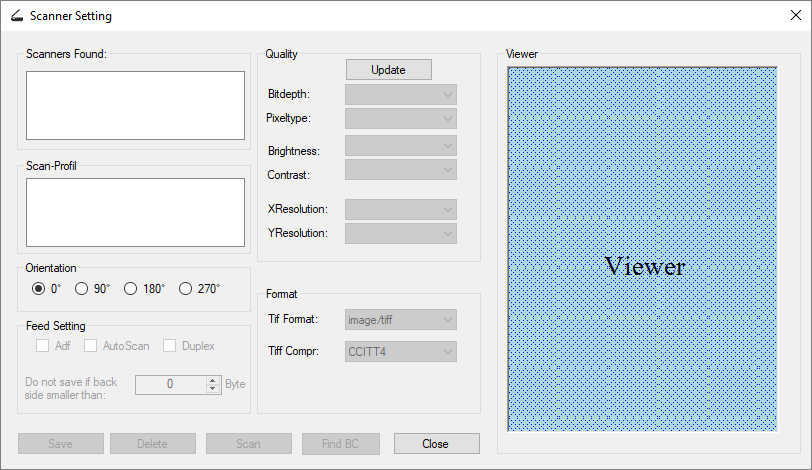
Figure: Dialog field “Scanner settings”
These scanner settings do not correspond to the manufacturer-specific configuration dialogs for the respective scanner. You can access these dialogs through the “Driver settings” menu item in the “Scanner” menu.
The following settings are available to you here:
Scanners found |
All detected scanners are listed here. Select a scanner with a double-click.
|
Scan profiles |
All scanner profiles of the selected scanner are shown here. Select a scanner profile with a double-click.
|
Orientation |
This way scanned documents can be automatically rotated before being saved as a TIFF file.
|
Feed setting |
ADF: If a scanner has a tray and automatic document feed (ADF), you can preset the document feed here with the ADF option.
AutoScan: This speeds up the scanning process, since the scanner’s internal memory is also used.
Duplex: Scans the front and back page. |
Do not save if back page smaller than ... bytes. |
The value entered here prevents a blank back page from being stored. This lets you import single-sided and double-sided documents in a stack together. This function is deactivated when the “0” value is entered.
|
Quality
|
All values entered under “Quality” are saved with the Update command.
|
Color depth |
You can choose from the following values (depending on the active scanner):
1 = black/white 8 = gray levels 24 = color
By saving with the Update command, the values for color and color depth are synchronized automatically. |
Color |
You can choose from the following values (depending on the active scanner):
BW = black/white GRAY = gray levels RGB = color
By saving with the Update command, the values for color and color depth are synchronized automatically. |
Brightness |
Enter a value for the brightness setting while scanning here. If the field is inactive, the active scanner doesn’t offer this setting.
|
Contrast |
Enter a value for the contrast level while scanning here. If the field is inactive, the active scanner doesn’t offer this setting.
|
XResolution |
Horizontal DPI solution at which the scanning should be performed (Recommendation for barcode recognition: 300 dpi or higher)
|
YResolution |
Vertical DPI solution at which the scanning should be performed (Recommendation for barcode recognition: 300 dpi or higher)
|
Format
|
|
File format |
Information about the saved file format. The PROXESS Scan Client only supports the TIFF image format. That is why this field is inactive and only used for information purposes.
|
Compression |
CCITT4 = recognized compression standard for TIFF files. This field is inactive and only used for information purposes.
|
Save |
With the Save command, all applied settings for the active scanner are stored in the scanner profile.
|
Clear |
The highlighted scanner profile is deleted with the Clear command.
|
Scan |
Execute a preview scan with the Scan command. This option is expedient for testing the applied settings. The scanned documents are not imported into the PROXESS Scan Client yet.
|
Find BC |
With the Find BC command, the barcode recognition is tested with the current settings. You will receive a message about which barcode was recognized. |
Close |
Close lets you exit the dialog box without saving your entries.
|