
Authentication via Windows does not enable access to “secured” databases, meaning those with activated high security and encryption. Only the correspondingly authorized users of the internal PROXESS user administration can access these databases.
As system administrator, you should organizationally divide all users who work with PROXESS into two user categories.
1. Users with Windows authentication
The system administrator adopts the user data from the Windows Active Directory for these users to avoid double administration in Windows and PROXESS. Users transferring from AD select the authentication option “Windows” in the login dialog of the respective module when logging into PROXESS. Then the Windows login information is automatically transferred to PROXESS. Here, it is recommended to suppress the login dialog for AD users in the respective module settings after the first login.
Members of this category, however, do not have any access to high-security databases—e.g., those for which high security and encryption are activated. This aims to prevent a situation where AD users automatically receive access rights to particularly sensitive documents and data in PROXESS simply by being assigned to an AD group, without these having to be explicitly declared in PROXESS. In practice, this will probably affect the majority of users who, for example, are not members of senior management or HR, and so do not need any access to specially protected data. For these users, Windows Active Directory integration can help to avoid double administration, thus making work easier for the system administrator. This also enables automatic login to the PROXESS modules for the user.
All steps for the Windows Active Directory Integration in PROXESS are described in this chapter.
Warning information
|
|
Authentication via Windows does not enable access to “secured” databases, meaning those with activated high security and encryption. Only the correspondingly authorized users of the internal PROXESS user administration can access these databases. |
2. Users with PROXESS authentication
Members of this category can access high-security databases (e.g., employee database) if they have been granted the necessary access rights in PROXESS. In practice, this will most likely be limited to a smaller circle of users (e.g., senior management/HR department). These users are created and managed directly in PROXESS. When logging in to PROXESS, the user selects the authentication option “PROXESS” and enters their PROXESS user name and password.
You can find all explanations about the internal PROXESS group and user management in the “User management” chapter.
Warning information
|
|
Avoid users with a “double identity” as Windows AD users and PROXESS users. Users should generally log into all PROXESS modules with one and the same authentication to ensure that they get a consistent basis for the data and access. |
Please be sure to first read the remarks in the preceding chapter: User management—concept and overview.
Step by step: Windows Active Directory Integration
Create a Windows authentication group for PROXESS in the management of the Windows Active Directory. You can select a random name for this. Select e.g., the group name “PROXESS” or another name, as in the example below. In this group, all Windows users who should work with PROXESS are collected. For that reason, add all Windows users to this group who should work with PROXESS and should log into PROXESS via the automatic Windows authentication. A good strategy is to work on a group level and add all Windows groups that should work with PROXESS. This ensures that all members of such a group are automatically added to the authentication group. Management via groups also makes the later administration and maintenance of the system easier for you. Then any newly added users, due to their Windows group membership, automatically also become members of the authentication group for PROXESS. A Windows group hierarchy is not adopted in PROXESS. Users of the groups and subgroups are adopted on equal levels.
First, create a Windows group with the name “LBF Everyone” in the management of the Windows Active Directory. In our example, this will be the Windows authentication group for PROXESS.
In the next step, add the Windows groups “LBF Sales”, “LBF Purchasing”, “LBF Financial Accounting”, “LBF Senior Management” to the newly created group “LBF Everyone”. Now you have added all users for later AD integration into the main authentication group for the PROXESS system.
Warning information
|
|
The membership of a Windows user in the authentication group is a mandatory condition for the subsequent assignment of PROXESS access rights to this user. |
Now open the program PROXESS Registry Setup in the PROXESS program group and select this new group in the Document Manager/User Login menu under “Authentication group”. First you must activate the “Windows domain” option in the section “External user system”. (Also see the documentation on the PROXESS Registry Setup)
Example: Select the group “LBF Everyone” created in step 1 as the authentication group.
|
|
For the PROXESS authentication group, be sure that you never fall back on existing internal Windows user groups such as “Everyone”. Since PROXESS regularly synchronizes the user groups, this will lead to performance problems with a large amount of user accounts.
To avoid this, create a PROXESS group as described in item 1, which you can then select as an authentication group in the above dialog. |
Now connect to the desired PROXESS system in the PROXESS Administrator Console again and select the “Groups” node. In the “Action” menu, choose the menu item Register Windows group.
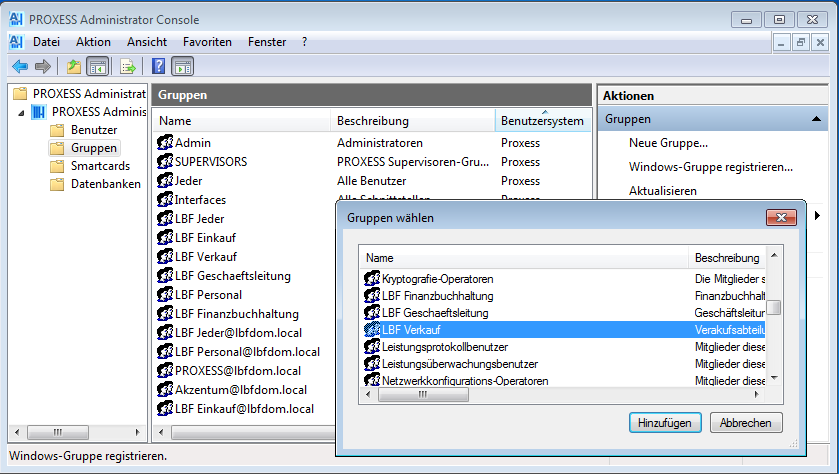
Fig.: Registration of a Windows AD group in PROXESS
Now select all the Windows groups that should be added for working with PROXESS. When the first Windows group is registered, all user data from these group members are adopted into the PROXESS user list. With the first registration of a Windows group, the main Windows authentication group and its members are also automatically adopted into the user management of the PROXESS Administrator Console. Users and groups transferred from Windows will be marked with the entry “Windows” in the “User system” column in the overview.
Example:
Select the Windows groups “LBF Sales”, “LBF Purchasing”, “LBF Financial Accounting”, “LBF Senior Management” for registration in PROXESS. The group “LBF Everyone” is automatically adopted as well. Now the PROXESS system automatically adopts all login information of the group members. You can review this in the PROXESS user overview.
Now assign the desired PROXESS access rights to the registered Windows groups.
|
|
In the relevant group, you can only assign rights to members who are also members of the above-mentioned Windows authentication group (see above). |
When the above-mentioned steps 1–4 are completed as in the example, new Windows users are automatically adopted into the PROXESS user management via their group memberships. By being added to a Windows group, this user will also automatically receive the PROXESS access rights assigned to this group. The prerequisite for this is again that the user’s Windows group is part of the Windows authentication group.
Summary: This means that a separate user and rights management is no longer required for PROXESS.