After the documents are scanned or imported, they are processed in document management. The purpose of document management is to review scanned documents visually, make corrections and index documents.
Step by step:
To access the scan editing features, open a scan profile and scan new documents or open an existing scan job with a double click.
Figure: The three processing steps during scanning
After accessing the editing window, you are automatically at the first processing step, “Import”. The “Document management” function can be accessed either via the bar in the lower left area of the screen (see fig.) or via the icon with that name in the image menu bar at the top.
Now the structure of the imported document stack is displayed as a tree layout in the left area of the screen. You can collapse and expand this tree layout with the icons “Expand” and “Reduce” (see image menu.)
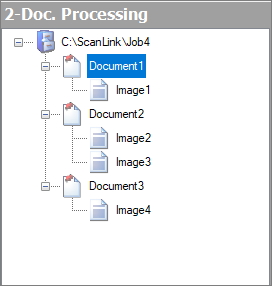
Fig.: Documents imported for document processing
Depending on the settings in the “Document and barcode” section, the documents are structured in the left tree view. The document and the images listed below it already represent a single-page or multipage document for archiving. You can see the currently marked image or document as a preview at the center of the screen. Here a recognized barcode has a colored border (also see Barcode settings) and is displayed in the Image menu bar on top.
Example: “Document binding by barcode” was selected in the settings. This means that the first image of a document has a barcode in each case. The following document pages do not have a barcode. The next imported page with a barcode signals the start of a new document.
The following manual editing functions are available to you in this processing step:
|
With drag and drop |
|
||
|
Move image pages |
Image pages can be moved within and between documents with drag and drop. If the first page of a document with a recognized barcode is moved, an error message appears in the list on the right: “BC not recognized.”
|
||
|
In the context menu |
|
||
|
Rotate and save image pages
|
With the context menu, images that were scanned in upside down can be rotated to the right or left by 90 degrees each and saved correctly. |
||
|
Clear |
You can also delete an image/document with the context menu.
Deleting with a keystroke combination: DEL = delete the marked image CTRL-DEL = delete the marked document with images
|
||
|
Documents splitting |
This enables you to manually set the beginning of a document. This option is used e.g. if a barcode wasn’t recognized. The image stack is divided at this point and a new document is attached to the stack here with all the following pages. You can reach this function via the context menu. |
||
|
Retroactive barcode recognition |
|
||
|
Find barcode |
You can start retroactive recognition of the barcode on the current page with the image menu item Barcode options/Find barcode.
|
||
|
Manual barcode entry |
You have the option of entering the barcode manually into the provided field on the top left in the image menu bar.
|
In the right area of the screen, you can find another type of representation of the scan batch divided into status and fields.
The status provides an overview of all documents of the current job with the associated barcode number and number of included pages.
The Fields column shows an index mask for the active document. Here you can add further index properties for archiving to the scanned documents.
The status overview provides an overview of the imported files and documents. If all pages with the same barcode should be combined into one document, the overview in the Files tab is particularly well-suited for a visual check.
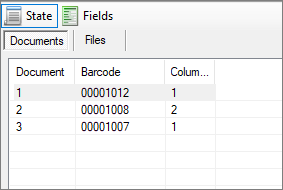
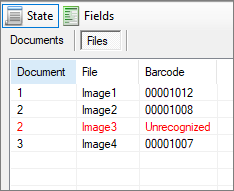
Fig.: Status overview of imported document in two variants
The displayed fields and their properties depend on the allocated scan profile (see chapter: Fields.)
This indexing can be carried out with a manual entry or by using the PROXESS Index Miner (you can find settings for this under Field properties.)
Indexing with the PROXESS Index Miner
PROXESS Index Miner supports users in manually indexing documents. With defined query fields (e.g. “CSno.” as customer number), already archived documents with a certain customer number are displayed. Then their index values can be automatically adopted via a mouse click.
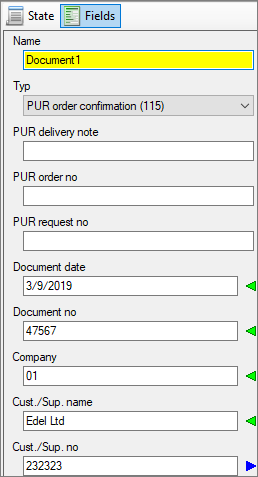
Fig.: Fields for the manual indexing of the scanned document
Red exclamation mark: indicates a mandatory field
The document can only be saved and transferred if there is an entry in this field. The document name and document type are automatically always mandatory fields.
Blue arrow: indicates a “query field”.
If a value is entered here, a hitlist appears with documents that are already archived in PROXESS and have an identical value. If a customer number is entered here, for example, already archived documents by the same customer will appear in the hitlist.
Green arrow: indicates a “result field”
If you now select an entry from the hitlist, the values of this already archived document will also be adopted for the new current document.
In the displayed example, the field “CSno.” marked with a blue arrow represents a query field. The fields “CS name”, “Street” and “Zip_City” marked with the green arrow are result fields that are filled automatically after a successful search.
Enter your description properties into the query field(s).
Exit the field with one of these keystroke combinations:
|
Tab or enter |
Jump to the next field If this is a query field, the current field data is used to create a hitlist.
|
|
CTRL + Enter |
Jump to the next field If this is a query field, the field data of all query fields is used to create a hitlist.
|
|
F12 |
Jump to the next field without creating a hitlist
|
|
ALT + Page up |
Jump to the preceding document (if available)
|
|
ALT + Page down |
Jump to the next document (if available)
|
A hitlist appears with existing entries in the archive that corresponds to the query values. You can limit the displayed hits in the hitlist under Advanced properties.
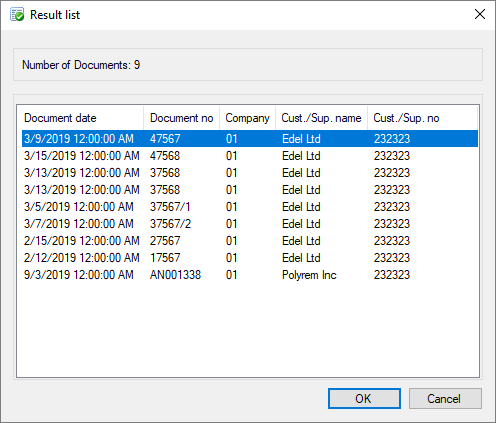
Fig.: Hitlist with matching entries from the archive
Save your entries with the Enter key. Now the next document and index mask are shown automatically.
If all documents in the scan job are aligned correctly, bound and indexed, the next processing step will start: “Release”.
