Distribute scan profiles via PROXESS Management Console
Nearly all settings for processing scan jobs are defined in a scan profile. A job is considered a certain amount of documents (e.g. a stack of scanned documents) that should be processed and archived with identical settings.
The scan profile settings are related to:
-
The assignment to the PROXESS archive
-
The transfer mode (e.g. online/offline)
-
The document split and barcode settings
-
The properties for individual index fields (properties fields)
-
The further processing with PROXESS Xtract
Profiles are user-dependent. A created profile is initially only visible to the user who created it (e.g. for the admin or the scan user 1, scan user 2, etc.). It is therefore possible that each logged-in user can see different profiles in the Scan Client start window.
Additionally, there is the option to transfer scan profiles to the server and distribute them centrally in the PROXESS Management Console.
Manage and distribute a scan profile centrally via the PROXESS Management Console
With this option you can download scan profiles from a workstation to the PROXESS server and centrally unlock them for certain users (or user groups). The creation and configuration of a scan profile are always carried out in the PROXESS Scan Client. The central management and distribution of the profiles are performed in the PROXESS Management Console.
The advantage of this variant is that you can manage scan profiles centrally and don’t need access to the local workstations.
Step by step:
1. Log in at an arbitrary workstation as an administrator for the PROXESS Scan Client.
2. Create a scan profile and save it (e.g. general scan stack). Please note the tip!
Tip
|

|
For scan profiles that are intended for central distribution via the PROXESS Management Console, do not activate the setting “This profile is available to all users”.
Background: Otherwise, users at this workstation might later see the profile double. First with the option “This profile is available to all users (of the workstation) and, second, with the central distribution via the PROXESS Management Console. This could result in ambiguities.
|
3. Highlight (select) the scan profile and select the command Transfer selected profile in the “PROXESS Management Console” menu.
Now the transferred profile will have an extension in parentheses behind the name.
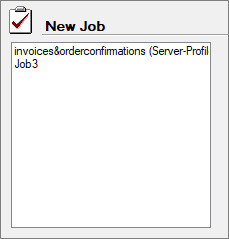
Fig.: Different scan profile names
Also see: Explanations regarding the scan profile names
4. Start the PROXESS Management Console and connect as an administrator.
Now the profile transferred to the server is available to you in the PROXESS Management Console in the administrator group:
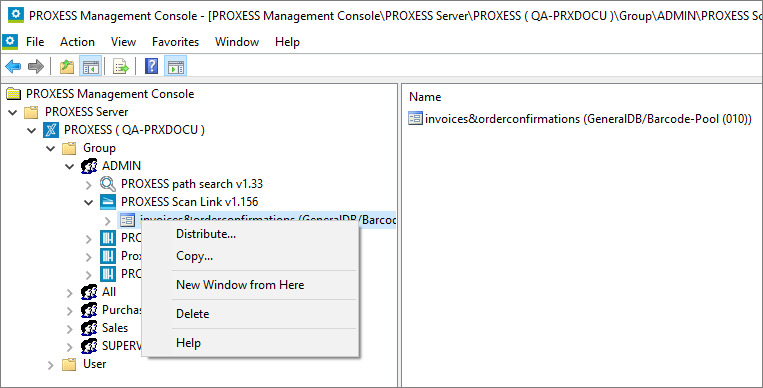
Fig.: Central scan link profile management in the PROXESS Management Console
5. Select the Distribute command in the context menu of the scan link profile and highlight the users or groups that should use the profile.
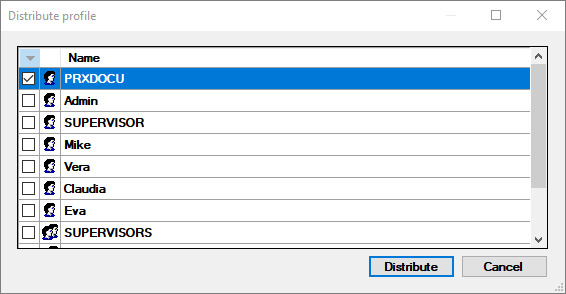
Fig.: “Distribute profile” dialog box
Confirm your selection with the Distribute command. You will get a message that the distribution has been performed.
6. Save your settings in the PROXESS Management Console with the command “Acquire all settings” via the context menu in the server node.
7. Affected users will automatically import the scan profile during the next start of the PROXESS Scan Client. Now the profile is available to the user at every workstation (scan station).
Use the menu “PROXESS Management Console” to define whether an info window appears at the start which informs users that a new profile is being imported.
________________________________________________________
Also see:
Distribute scan profiles via XML
Digression: Scan profile names