After the PROXESS Scan Client is installed, no login information is available for the initial activation.
The following login mask appears:
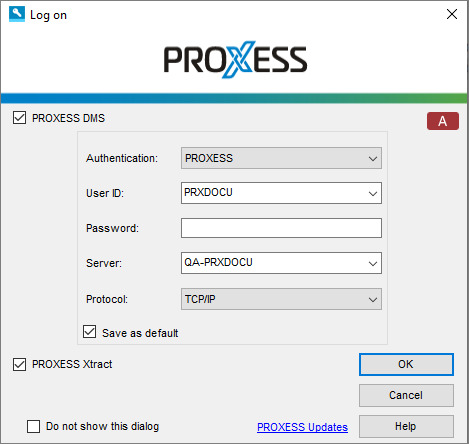
Fig.: The PROXESS Scan Client login mask (already with entries in this example)
The following entries are necessary for login:
|
PROXESS DMS |
The scan profile settings determine whether the documents should be transferred to PROXESS DMS.
If this option is active, all scan profiles for which this kind of archiving to PROXESS has been set up will be displayed after login.
If the option is deactivated, these scan profiles will not be shown after login.
Also see the option “PROXESS Xtract” further below
|
|
A or SQL |
Option A: Traditional management of the profile data in an Access database
Option SQL: Central management of the Scan Client profile data in an SQL database. You should select this option when you use a terminal server.
You can find configuration tips under Digression: Profile management with SQL database
|
|
Authentication |
PROXESS: Enter your PROXESS user name and password and log in with these. The prerequisite for this login is that the PROXESS system administrator has registered you as a PROXESS user.
Windows: The system automatically applies your Windows login information to the PROXESS login. The prerequisite for this login is that your PROXESS system administrator has previously registered and configured your Windows user account in PROXESS (Active Directory integration).
If necessary, ask your system administrator about the authentication option you should use. |
|
Server |
Enter the name or IP address of the desired PROXESS server here. |
|
Password |
Enter your password here. Changing your own password is possible e.g. in the PROXESS program. |
|
Users |
Enter your short user name for PROXESS here (e.g. “Miller”). |
|
Protocol |
Select the network protocol to connect to the PROXESS server here. PROXESS offers TCP/IP and Named Pipes as protocol sequences. If the installation is for a single workplace or if the client and server are installed on the same computer, select the option “Local server”. |
|
Save as default |
When this option is activated, the last entered user information, except the password, is displayed again for the next login. |
|
PROXESS Xtract |
The scan profile settings determine whether the documents should be transferred to PROXESS Xtract for processing. If they are to be transferred, the “Xtract” tab must always be completed when the profile is created.
If this option is active, all scan profiles for which further processing with PROXESS Xtract has been set up will be displayed after login.
If the option is deactivated, these scan profiles will not be shown after login.
Also see the option “PROXESS DMSt” above. |
|
OK |
Confirm your login information with OK. |
|
Cancel |
Use Cancel to terminate the login without saving your login information. |
|
Help |
With Help, you can access the online help. |
|
Do not show this dialog |
If this option is activated, the login mask will not be displayed the next time the program is started and the most recently saved login information and settings will be used. In the start window of PROXESS Scan Link, you have the option to reactivate them with the “File” menu and the Show login mask command. |
|
PROXESS updates
|
Metadata update: You can use this to activate the automatic metadata update. This performs an automatic and time-controlled update of metadata acquired from the PROXESS archives—such as document types, thesauruses and index fields—during login. The option is deactivated by default.
Automatic profile matching during login: Scan Link profiles can be set up on the server via the PROXESS Management Console and distributed to various user groups. By default, the scan profiles on the server are accessed and matched with the status of the workstation at login. This can delay the login process. For that reason, the automatic profile matching can be deactivated here and activated only temporarily, for example, after the configuration tasks have been performed.
Also see: Digression: PROXESS updates |
Enter the login information and select the OK command.
|
|
When the program is started, an error message is displayed: “Updating the database structure failed.”
Possible cause: The program can’t be started as the user doesn’t have full access to the Scan Links database in the PROXESS installation directory. The logged-in Windows user should therefore receive local administrator rights. |
Also see:
