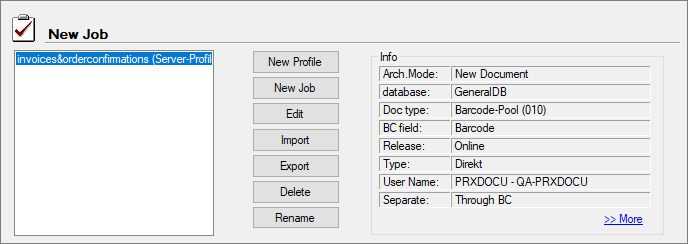
Figure: The “New job” area in the main window of the PROXESS Scan Client
The following settings are possible:
|
Profiles |
Already created scan profiles are listed under Profiles. When the PROXESS Scan Client is started for the first time, this list is empty and all buttons are deactivated, except New profile and Import. If you have selected an existing profile, the other buttons will also become active. Detailed information about the highlighted profile is shown on the right.
|
|
New profile |
With this button you define a new scan profile. Configured scan profiles will only apply to the currently logged-in user. With the “Advanced properties” tab you can make the profile accessible to all users. You can learn more about creating a new scan profile in the chapter “Create new profile”.
|
|
New job |
With the New job button, you open a new scan job. The scanning interface of PROXESS Scan Client will open. First you must have selected a profile on the left. Now you can scan documents or import and edit TIFF files. (Alternative access by double-clicking scan profile)
|
|
Edit |
You can change scan profiles with the Edit button.
|
|
Import |
With the Import button, you can import individual scan profiles in the format of an XML file. This makes sense particularly when different PROXESS scan stations should use the same settings. The prerequisite for importing a scan profile via XML file is that an active scan profile was exported first.
|
|
Export |
You can also make a created scan profile available to other workstations with the Export button. The profile will be stored as an XML file and can now be imported by other workstations (see above).
|
|
Clear |
You can delete existing scan profiles with the Clear button.
|
|
Rename |
With the Rename button you can rename existing scan profiles.
|
|
Info |
The Info box lists the most important parameters of a scan profile.
|
|
>> More |
All settings of a scan profile are listed here in the form of a clear directory structure. |
Also see: