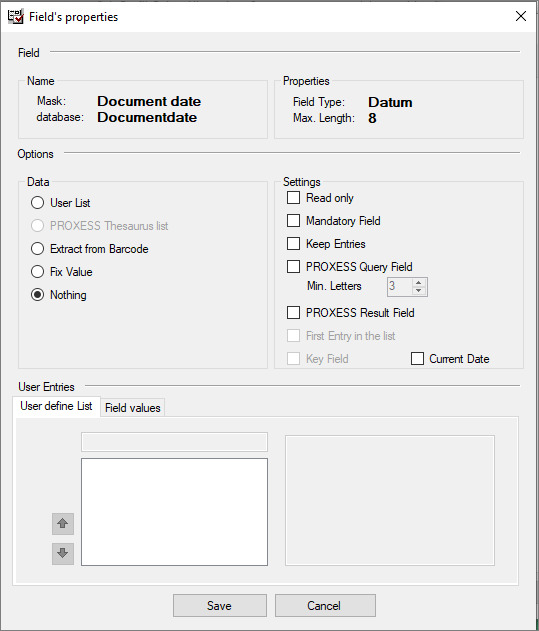
Here you have extensive setting options for individual fields that you selected for the scan profile. All properties that are defined for a particular field here are only valid for the respective scan.profile. The same field can have different properties in a new scan profile.
Figure: Profile settings in the “Fields/field properties” tab (here for the field: Document date)
The setting options in detail:
|
Field (name and properties) |
The displayed field properties are defined in the PROXESS Administrator Console and can’t be edited here.
Mask: Field designation in the document mask/index mask Database: Name of the field on the database level Field type: Data type of the field Max. length: Maximum field length |
|
Options/field data |
|
|
User-defined list |
A manual selection list with entries of available options during the scan and indexing process is assigned to this field. The entries can be filled in below.
|
|
PROXESS thesaurus list |
If the field has already been filled with a thesaurus (selection list) via the PROXESS Administrator Console, this is also available in the PROXESS Scan Client. Edits to the thesaurus are also made via the PROXESS Administrator Console and are then available for general use.
|
|
Extract from barcode |
If this option is active, the field is filled with the recognized barcode value. There is the option to acquire the complete barcode or individual sections of the barcode for this field. If only sections should be shown, this is configured in the Barcode mask area.
|
|
Fixed value
|
With this selection, you can defined fixed values with which the field is filled automatically. In addition to manually entered values, you can select from four rules that can also be combined: see Enter fixed value on this topic.
|
|
None |
This is the default setting. No field content is predefined. The field can be filled manually during the archiving.
|
|
Options/settings
|
|
|
Read only |
The “Read only” setting means that the user is unable to change the content of this field. This makes sense when the system automatically fills fields, e.g. via the barcode recognition or the PROXESS Index Miner. |
|
Mandatory field |
If a field is marked as a mandatory field, it must be filled. Otherwise no storage or archiving is possible.
|
|
Keep entries |
The user’s last entry in this field is used as a template during the automatic switch to the next document.
|
|
Min. characters |
Here the current field can be defined as a query field. When indexing the scanned documents, entries in these fields trigger automatic retrieval in the archive and the corresponding hitlist is shown. Now the user can automatically adopt the shown index values in fields defined as result fields. To use this function, result fields must be defined in advance (PROXESS query field). The minimum amount of characters to start the search prevents the hitlist from becoming too large (also see Indexing with the PROXESS Index Miner.)
|
|
A field marked as a PROXESS result field is filled with the values of fields with the same name in the selected document from the above hitlist (also see Indexing with the PROXESS Index Miner.)
|
|
|
First entry in the selection list |
When user-defined lists or thesaurus lists are used, the default entry for the selection list can be defined here.
|
|
Key field |
This field is only active if the option Update/reset or Update/create new was selected in the tab for the archiving mode (see “PROXESS” tab.)
If an already archived document should be updated with new data (new index values or new scanned files), at least one unique field must be defined as a key field. An update is only performed when the key field(s) is/are identical.
|
|
Current date |
This option is only shown for fields of the “Date” data type. If the field is a date field, you can define that the current date is entered automatically.
|
|
User entries |
|
|
Tab: User-defined list
|
Similarly to thesaurus lists, user-defined lists with entries can be created here. These are then available interactively for indexing. |
|
|
Fixed values can be defined here, which are entered automatically by the system:
The current date is inserted. You can choose between the day-month-year and year-month-day formatting.
The logged-in user name is inserted.
The document type is inserted.
The job number is inserted.
The PC name of the scan station is inserted.
In addition, Windows system variables can be entered (e.g. %scanlocation%). This requires that each of these system variables were previously defined at the local scan stations. |
|
User entry/field values |
|
|
|
You can use this mask to adopt sections of a barcode number/a barcode string into index fields. This makes sense especially when they are logical barcodes. The unlocked configuration options depend on the selection in the “Field data” area and on the barcode configuration in the “Document and barcode” tab.
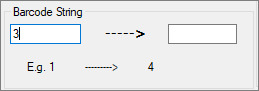
On the left, you can see an example of 1D barcodes and 2D barcodes with “Fixed length”: --> The 1st to 8th characters of the barcode string are entered in this field.
Here you can see an example of 2D barcodes with the configuration “Separators and index assignment”: --> The 3rd index is read and entered in the field Example of a 2D barcode string: 1;25.10. 2016;471123;895672;50 --> The third index value is 471123.
|
|
2D barcode configuration—selectable key |
Requirements: The program reads 2D barcodes (e.g. QR codes) and, to interpret the barcode string, the option “Selectable key” was chosen in the 2D barcode configuration. You can find these settings in the “Document and barcode” tab.
Enter the field designation (usually a prefix including separator) from the barcode string. In the field properties of the PROXESS field “Document no.”, enter the designation “DCNR:”, for example.
|
|
Save |
With Save, the settings for the current field are applied. |
|
Cancel |
Use Cancel to close the window without saving your entries/changes. |
|
Help |
With Help, you can open the online help. |