Information about the barcode recognition and binding, i.e. the combination of individual pages for content-related documents is entered here.
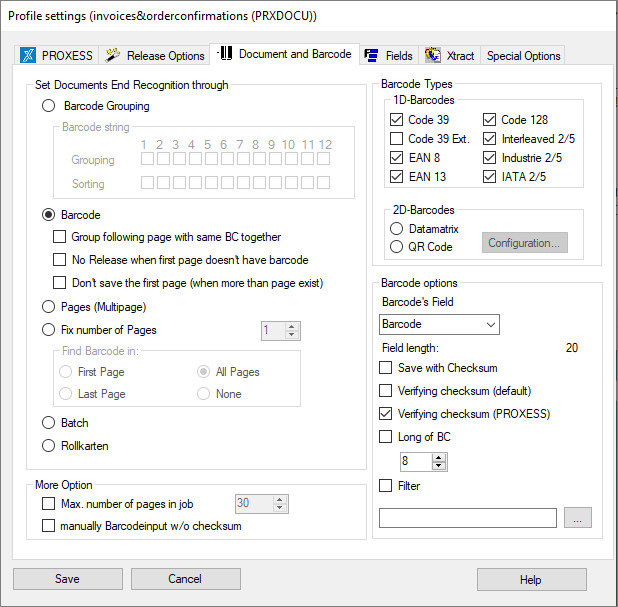
Figure: PROXESS Scan Client profile settings, “Document and barcode” tab
Example:
Only the Interleaved 2/5 type of barcode should be recognized within a scan batch (other barcode types are then ignored by the system). The recognized barcode value should be transferred to the “barcode” index field without check digits. Additionally, the barcode marks the first page of a document/receipt. For that reason, pages without barcodes are automatically combined into one document with the first barcode page.
Settings for document bindings:
|
Document binding |
The document binding combines individual scanned pages into one document with one or more pages. |
||
|
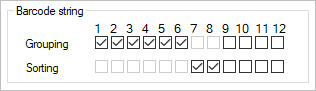
Group and bind by barcode
Group
Sorting
|
Pages that have a barcode can be combined into one document based on barcode number ranges.
You can specify the grouping by highlighting the number position within the barcode number.
Pages with barcodes whose highlighted areas have the same numbers are saved as one document under the same group number.
Example: The first five digits of the barcode are highlighted under “group” on the side. This way all scanned pages are combined into one document if they have a barcode with the same first five digits (e.g. the barcode numbers 47115 001, 47115 002 and 47115 003). The scanned pages are combined into a document with three pages under the group number “47115”. The identical digits can refer to a case or purchase agreement number. This makes it possible to automatically bind a three-page purchase agreement into one document during scanning.
If the pages are unsorted, additional areas in the barcode can be defined according to which the pages are sorted within the document.
Example: The digits “6”, “7” and “8” are highlighted. These digits in the barcode could indicate the page numbers. If pages are scanned in the unsorted sequence 47115 002, 47115 003, 47115 001, the PROXESS Scan Client automatically sorts the pages in the right order and combines the document accordingly. |
||
|
Bind by barcode |
If this option is activated, each barcode determines the start of a new document. Pages without barcodes are evaluated as succeeding pages and combined into a multipage document.
“Bind following pages with same barcode together” Select this option if the same barcode number is shown on each page of the document. This could be the document number, for example. Then the following pages with the same barcode are combined into a multipage scanned document.
“No release when first page doesn't have barcode” This checking routine goes into effect after scanning as part of approving a job. If the first page of the bound document doesn’t have a barcode, you will receive a corresponding notice and the document won’t be archived. This option only goes into effect with the Online or Offline setting in the Transfer tab.
“Don't archive the first page” Select this option if cover sheets with a barcode are used within a scan batch to split documents. |
||
|
Pages (multipage)
|
With this option, multipage scanned files (multipage TIFFs) are transferred from a folder in Windows Explorer and combined into a joint document. |
||
|
Fixed number of pages
|
Select this option if all documents in the scan batch have the same number of pages, e.g. if the documents are all one-sided. A possible scenario here is that the documents are pre-ordered according to the page amount before scanning.
You can also determine whether a barcode on the documents should be recognized or not. The barcode can be searched for on the first page, the last page or on all pages. Select the None option if you’re scanning without a barcode.
|
||
|
Batch |
This option is for documents without barcodes. In this case, all documents of an inserted scan batch are bound into one document. |
||
|
Roll cards |
This option allows for multiple barcodes on one page. During further processing, the page splitting and document binding is carried out according to the marked separators and barcodes on one page. (Example: archiving of smaller delivery slips.)
|
Barcode selection:
|
1D barcode |
Here you select the barcode types to be recognized and evaluated by the program. You can also select multiple barcode types here. Only the barcode types “code 39” and “code 39 ext.” are mutually exclusive for technical reasons.
|
||
|
2D barcode |
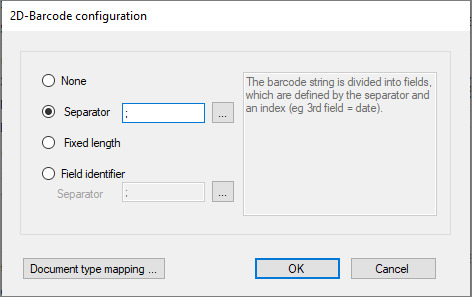
Choose between “Data matrix” and “QR code” |
|
None |
The read barcode string is only written into the target field for the barcode. |
||
|
Separator
|
The read barcode string is written into the target field for the barcode.
Additionally, the content of the barcode string is divided into further index fields. Enter the separator used in the barcode string here.
You have to assign the values in the barcode string to PROXESS fields under the Fields/field properties tab.
|
||
|
Fixed length |
The read barcode string is written into the target field for the barcode.
Additionally, the content of the barcode string is divided into further index fields. The division is performed according to fixed positions within the string (for example: date starts at position 10 and ends at position 17).
You have to assign these fixed positions in the barcode string to PROXESS fields under the Fields/field properties tab. |
||
|
Field identifier (with separators)
|
The read barcode string is written into the target field for the barcode.
Additionally, the content of the barcode string is divided into further index fields. The division is performed according to a field identifier preceding the actual index value (e.g. DOCTYPE: outgoing invoice.)
Here too a separator is applied between the index value and the following field identifier in the barcode string.
|
||
|
Document type mapping |
Here you can assign the names of document types from the barcode string to PROXESS document types (see figure below.) |
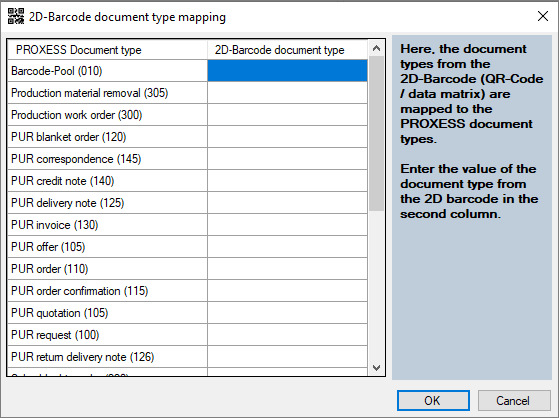
Fig.: Dialog on document type mapping for 2D barcodes
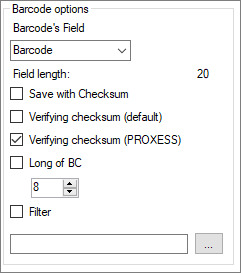
Barcode options:
|
Barcode field |
Here the barcode is assigned a target field in the archive. The fields displayed in the selection list depend on the selected archive database in the PROXESS settings tab.
There are additional options for 1D barcodes, including archiving with or without check digit, checking the check digit or the length of the barcode.
|
|
Save with check digit
|
only for 1D barcodes: If this option is active, the barcode number is entered into the barcode field selected above with the check digit (e.g. the last two digits). Since the check digit has no further function after the barcode recognition, the check digit is usually not transferred and this option is not activated.
|
|
Verifying check digit (default)
|
only for 1D barcodes: Here the single-digit standard check digit routine (7+1) is activated. In this case, the last digit in an 8-digit barcode is the check digit.
If you are using a barcode type with a check digit, it is recommended to activate this option.
|
|
Verifying check digit (PROXESS) |
only for 1D barcodes: This activates the two-digit PROXESS check digit routine (8+2). In this case, the last two digits in a 10-digit barcode are the check digits.
If you are using a barcode type with a check digit, it is recommended to activate this option. |
|
Specify length (only for 1D barcodes)
|
Certain barcode types (e.g. interleaved) can have various lengths. This additional filter option makes it possible to filter out the barcodes that shouldn’t be recognized (foreign barcodes).
|
|
Filter (only for 1D barcodes) |
When you activate this option, you can set a selection filter for the barcode recognition. This way the system only enters barcodes as recognized when they match the filter criterion. With this option you can e.g. exclude foreign barcodes or assign a separate barcode range to the current profile. With the
|
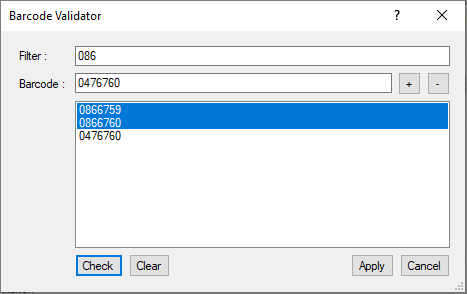
Fig.: Barcode validator
You can generally use the “Regular expressions” of the Microsoft Visual Studio as barcode filters. You can get an overview of all available “Regular expressions” via the question mark on the top right edge of the screen. You will need internet access to call up the online help from Microsoft.
Examples of filter expressions:
Filter expression: ^086
Selects all barcodes that start with the number combination “86” (e.g. 86123432, 86444442, 86743005).
Filter expression: 086
Selects all barcodes that contain the number combination “086” (e.g. 12348652, 56238609, 86743567).
Filter expression: ^[1–5]
Selects all barcodes whose first digit is between 1 and 5 (e.g. 12345678, 32575663, 45789717).
Other settings:
|
More options:
Set maximum number of pages |
This limits the scan batch and the transfer job to a certain maximum number of pages. As a result, very large scan jobs are avoided, which are very complex and thus difficult to handle during further processing. The size of the transfer jobs to PROXESS Xtract can also be limited. It is not possible to divide a job retroactively.
|
|
Manual barcode input without check digit |
By default, the check digit function is also performed when the barcode is entered manually, as long as the option “Review check digit” is activated for barcode recognition (see above). This means that the user enters the barcode manually with a check digit. It is then reviewed and truncated by the system and entered into the “Barcode” field without a check digit.
If the setting “Manually barcode input without check digit” is activated, no check digit is verified during the manual entry of the barcode. All manually entered numbers are acquired are barcode numbers. In other words, in this case the check digit of a barcode may not be entered.
|
|
Save |
With Save, the applied settings are adopted in the current profile. If the button is inactive, the settings are still incomplete. (For example, no settings have been applied in the “Xtract” tab yet. If you want to work without PROXESS Xtract, just activate the option Without Xtract here.)
|
|
Cancel |
Use Cancel to close the window without saving your entries/changes.
|
|
Help |
With Help, you can open the online help.
|
Also see:


 button, you access the barcode validator (see fig. below). It also offers the option of performing a manual test of the entered filter expression.